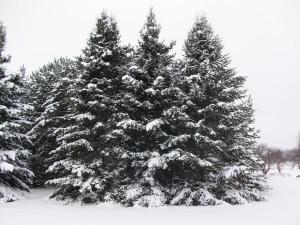
Aaand again with the decade between my posts. There are no words. I simply get distracted by everything else around me, and it doesn’t help that I typically sink into a mild winter funk of tired sluggishness. The early darkness does it, or something. This happens even when the winter is mild as ours has been so far. We’ve only had one ‘snow storm’ of a few inches so far, and the snow only lasted two days before melting. It’s a far cry from some of the winters of my childhood.
A trespassing thief stole my trail camera already, making my Thanksgiving-time quite grumpy-like. Regular season deer hunting has come and gone. I shot a nice doe on opening day that would’ve given me fodder for a few posts if I had thought about it at the time. I used some of her for jerky, made hot Italian sausage, and doubled the family recipe for korv as well. This is on top of the number of roasts I saved (and the butchery that came before all that). Oh well. Maybe next time. For now, the upcoming holiday season gave me a different idea for a quick, easy, and money-saving thing to share with you all.
Here at SVF, we grew our own Christmas trees for many years out of a patch of conifers my dad planted some decades ago. I love the smell of their boughs. The fresh, bold scent seems to lift my spirits, and their green color defies the weather even when everything else is grey. However, things have changed and grown up since I was younger, and now the trees are all too big for that purpose (maybe we could use just one branch? :P). Due to changes in our family, though, we rarely ever have a Christmas tree anymore anyway.
Even so, I don’t have to miss out on the experience. It’s easy to make a homemade wreath out of conifer boughs and it doesn’t require cutting down or even really injuring a tree. They take up very little space and can be put in ‘extra’ areas like the backs of doors or corners of walls – perfect for someone with little floor space. It also saves the expense of buying, for those who enjoy wreaths.
All you need:
- – Cutting tools (I use a hunting knife and any pair of scissors. Pruning snips are great too)
- – String/twine (I like a natural fiber brown twine as it blends in better and is completely biodegradable after, but you can use anything you have laying around)
- – Pine, spruce, or fir tree with branches low enough to be reached safely

You may want to wear gloves if you don’t like your hands getting any sap on them. However, I find that it isn’t that big of an issue, and fresh sap doesn’t seem to be as gooey as old sap anyway. I’ve never had a problem.
You do not NEED a ‘form’ for making a wreath under any circumstances. It’s a mistake to think you do. However, if you’re really struggling with it, you can do something as simple as bend an old wire clothes hanger into a circle, and that will generally suffice as a guide.
The best type of tree to use is up to you. You can use any conifer, but I chose my balsam firs. You may want to decide based on what you have access to. Make sure to ask the landowner if you want to go on private property! You can also often find discarded trimmings at tree farms or nurseries/stores that sell large quantities of ‘live’ Christmas trees. Just ask someone working there. The worst you get is a no.
Firs have needles that are flat/two-sided and generally single on the branches. They also tend to have ‘softer’ needles that don’t stab your feet as much when they fall off and end up on your floor. Pines generally have needles in bunches of 2-5 that tend to be longer and more ‘feathery’. They are soft, but tend to be more sparse looking and harder to make a pretty wreath out of. Spruces have 4-sided/’square’ needles (in cross-section), and though they tend to be good-looking, they are very pointy when dry and underfoot. These facts add to the reason I chose my firs.

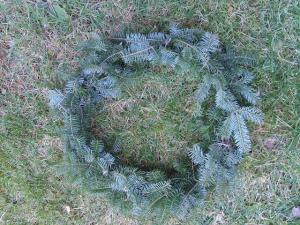
Select some branches and trim them from the tree. You’ll want to use the ends of branches if the tree is large, as they bend more easily and have more needles. It helps if you can select ones that are naturally a bit curved, but it isn’t a necessity. Once you have some branches, arrange them to form a framework, and tie them together. If you need to, pick them up and gently but firmly bend them, working them with your hands. They will take on more of a shape you need with some coaxing. You can also partially break them if necessary, damaging the inner pith but leaving the bark intact so it stays together.
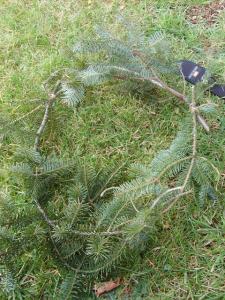
After I have my beginning ‘circle’, I trim off my twine ends, and remove any really too-long or dangly offshoots and put them into another pile. It’s good to leave some on the base branches, though – use the twine to tie them down a bit so they’re not all straggly and so they conform to your base circular shape. Keep tidying up your twine ends as you go, clipping them close so they don’t stick out.

I’m left with thinner trimmings like this. It’s never enough, though, so I go back to the tree and select some more small offshoots of the branches. You’ll need a nice little pile. I prefer to make my wreath right next to the tree, so I can take more as I go if I need to, but if you want to make it inside or at another location, clip extra so you don’t run out. It’s better to have too much than not enough.
Lay them along the shape of your rough wreath and eyeball them. See how they look, and arrange them so they’re pleasing to the eye. You can do this however you prefer. If you like them all pointing in one direction, do it. Prefer them to go opposite ways and meet at the top or bottom? Do it. Prefer a jumbly arrangement? Whatever you like is fine! Tie them down with the twine. You can make effort to hide the twine if you want, burying it under the needles, but as you add branches, you’ll find that it becomes hidden on its own. Some don’t even need to be tied down, either. Just ‘thread’ them in between the other limbs and branches, and they’ll stay down on their own.

After some tucking, I got this, but it wasn’t quite full enough for me, so I trimmed a few more limb ends…
After I got this, I thought it wasn’t too bad! It was giving off a lovely scent, too.
I set it on my stoop and walked over to my Norway spruces, which drop long, thin cones. I easily found a few good, clean samples, and tucked them into the wreath as a decoration. I used no glue or anything, just careful placement. You can do this with any kind of cones, leaves, grasses, or any other decoration you’d like to add. For stubborn things like really big pine cones, bury the bottoms in the pine foliage and use twine to tie them on. If it still won’t stay in place for some reason, you CAN hot glue it in there, but I’ve never found it necessary.

And there you have it… a decent looking wreath, and it didn’t cost me anything, because all I used was stuff I already had or that was growing around me. Just loop it over a hanger you might already have, or just tie a circle of twine on top and hang it from any old nail in the wall like I do. 🙂
This was a quick one, too. If you spend even more time with it, you can orient the branches just perfectly to how you like it, and get one that looks even more fabulous to you.
Happy holidays!
 Plastic containers from fast food restaurants
 Fast food containers